Tire Maintenance & Safety
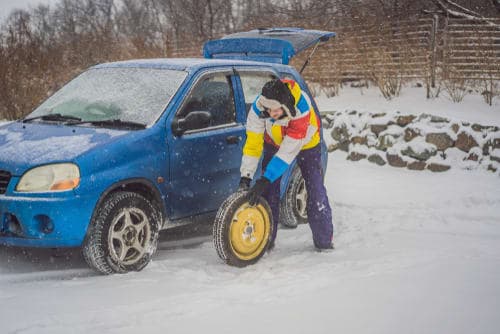
How to Change a Flat Tire in Winter: A Step-by-Step Guide

Free shipping
Best price guarantee
Special pricing
Financing with Resolve
Easy returns
Tire Maintenance & Safety
Winter brings unique challenges to drivers, particularly when faced with roadside emergencies. Cold temperatures, snow, and ice transform a simple tire change into a potentially dangerous situation that requires proper preparation and knowledge.
Flat tires occur more frequently during the winter months due to temperature fluctuations and hazardous road conditions. Potholes multiply as freeze-thaw cycles damage pavement, while sharp ice chunks and hidden debris pose constant threats to tire integrity.
The ability to change a tire safely in winter conditions can mean the difference between a minor inconvenience and a serious safety risk. Extended exposure to cold weather while stranded can lead to hypothermia, and poor visibility increases the danger from passing traffic.
Winter tire changes demand more than basic mechanical knowledge — they require an understanding of how cold weather affects both equipment and human performance. When temperatures drop below freezing, metal components contract and become brittle, while rubber loses flexibility. This makes tasks like loosening lug nuts significantly harder than in warmer conditions. Your fingers lose dexterity in the cold, turning simple actions into frustrating challenges that extend your exposure time on dangerous roadsides.
The safety risks multiply exponentially during the winter months. Icy road surfaces create treacherous conditions for both you and passing vehicles, while reduced daylight hours mean many tire changes happen in darkness. Snow and slush can obscure hazards like uneven ground or drainage ditches, making proper vehicle positioning critical. Additionally, winter weather often brings:
Preparation makes the difference between a successful tire change and a dangerous situation. Understanding proper winter tire change procedures ensures you can work efficiently, minimizing exposure time while maintaining safety protocols. This knowledge becomes especially important when professional help might be hours away due to weather conditions or remote locations. Having the right tools, wearing appropriate clothing, and knowing specific cold-weather techniques transforms an emergency into a manageable task you can complete safely and return to your journey.
To effectively handle a flat tire in winter, start by verifying that your vehicle is stocked with a well-maintained spare, a functional jack, and a lug wrench designed for cold conditions. Pack a winter-specific emergency kit that includes hand warmers, a reflective vest, and a sturdy tarp to kneel on. Regular checks of these supplies, particularly before winter sets in, ensure they remain in optimal condition for any road situation.
Find a secure spot away from the flow of traffic and check that the ground is stable and free of ice. Activate your hazard lights to communicate your presence to other drivers, reducing the risk of accidents in low-visibility conditions. Apply the parking brake and use items like large rocks or wheel chocks to immobilize the wheels, which is especially required on slick, icy surfaces.
Before proceeding with the tire change, gather all necessary equipment, including a reliable flashlight to combat winter's early dusk. Insulated gloves are essential to protect your hands from the cold, ensuring you maintain grip and precision while working. If lug nuts prove difficult to loosen due to rust or freezing, a quick application of a de-icing spray can make the task manageable. Proper preparation and attention to these details make the tire change process in winter more efficient and secure.
Assembling a comprehensive set of tools for winter tire changes is very important. Start with a dependable jack suited for your vehicle's weight and a lug wrench with a comfortable grip. Include a robust flashlight to illuminate your work area as daylight fades early during the winter months. Equip yourself with durable, weather-resistant gloves to keep your hands warm and functional.
Build a flat tire emergency kit tailored for winter conditions. This should contain items like a high-visibility vest for safety and chemical hand warmers to combat the cold. A waterproof mat or thick blanket will serve as an effective barrier against snow and ice, providing a dry and stable surface for your work.
Consider additional tools that address unique winter challenges. A bottle of rust-penetrating spray can help with tight lug nuts, and a portable tire inflator ensures your spare tire is at the correct pressure. These thoughtful additions streamline the tire-changing process and enhance roadside safety in harsh weather conditions.
Vehicle safety during a winter tire change requires careful attention to detail. Start by switching on the hazard lights—this action makes your vehicle more visible amidst winter's reduced visibility conditions, effectively warning approaching drivers. Park on a level, stable surface, clear of traffic and potential hazards like accumulated snow or icy patches.
Stability is key. Firmly engage the parking brake to secure the vehicle, especially vital on slippery or uneven ground. For an added layer of security, use wheel chocks or large stones behind the tires opposite the flat one to prevent any movement. If you don't have wheel chocks, positioning the vehicle against a curb can also help prevent sliding.
Survey the area around your vehicle to identify any hidden dangers. Clear the space to ensure a safe working environment, free from obstacles that could cause slips. In severe weather conditions, such as heavy snow or freezing temperatures, consider calling for professional assistance. These steps minimize risks, allowing you to focus on the tire change with peace of mind, ensuring a safe continuation of your journey.
Before lifting the vehicle, focus on relaxing the grip of the lug nuts—an important step in ensuring a seamless tire change. Secure your footing on stable ground, and apply steady pressure to each lug nut using a wrench. By addressing this task prior to elevation, you prevent the wheel from shifting, facilitating effortless removal. The chill of winter can make components more rigid, emphasizing the need for a firm hold on your tools.
In frigid weather, stubborn or corroded lug nuts benefit greatly from a quick application of a rust-busting spray. Simply spray onto each nut, giving it a moment to work its magic by penetrating rust and easing resistance. This approach reduces the physical strain often associated with this task. For especially resistant nuts, a slight nudge with your foot on the wrench might be necessary, but proceed with caution to maintain a controlled, safe environment.
Tackle each nut systematically, alternating in a cross pattern to ensure even distribution of effort and prevent potential warping of the wheel. This methodical approach transforms a potentially challenging task into a straightforward procedure, enabling you to manage the tire change efficiently and effectively.
With the lug nuts already loosened, the next step involves elevating the vehicle. First, locate a solid jack point on the vehicle's undercarriage — this is typically indicated in your owner's manual or by markings under the car. Ensure the jack is positioned correctly and begin to lift steadily, being careful to avoid any sudden movements that might destabilize the vehicle. Aim to raise the vehicle just enough to allow the tire to be removed easily.
Stability is important once the vehicle is off the ground. Double-check the jack's placement and monitor for any signs of shifting. With the vehicle securely elevated, completely unscrew the loosened lug nuts and place them in a safe spot to prevent them from rolling away. Gently slide the flat tire off the wheel hub, using controlled motions to maintain the car's balance.
Before installing the spare tire, inspect the wheel hub for any debris or damage that might hinder the new tire's performance. This inspection step ensures that the hub is ready for the replacement tire and helps prevent future complications. This careful approach to tire changing is essential for a safe and effective resolution to your roadside issue, preparing you for a smooth drive once the spare is in place.
Carefully position the spare tire onto the wheel hub, ensuring the bolt holes are perfectly aligned. This requires precision to ensure the tire fits snugly onto the hub. With the tire held in place, start threading the lug nuts by hand to avoid cross-threading, which could damage the bolts.
Before tightening the nuts fully, assess the spare tire's condition thoroughly. Check for any visible signs of damage or wear that might affect its performance. Confirm that the spare is inflated to the correct pressure using a tire gauge—an essential step for safe driving.
Once the tire is properly seated, tighten the lug nuts using a wrench, following a star pattern for even distribution. This method ensures the tire is secure and balanced. Gradually tighten each nut, alternating positions to maintain alignment, until they are all firmly in place. This approach guarantees that the spare tire is securely mounted, allowing you to resume your journey safely.
After ensuring the spare tire is properly mounted, the next step involves gently lowering the vehicle to the ground. Gradually release the jack, ensuring the vehicle descends smoothly and maintains stability upon contact with the ground. Pay close attention to any shifts that might occur during this process, as maintaining stability is crucial for the safety of the wheel and the vehicle.
Once the vehicle is firmly on the ground, focus on securing the wheel with precision. Begin tightening the lug nuts, alternating between opposite sides. This approach ensures that the pressure is applied evenly across the wheel, which helps in maintaining the tire's alignment and preventing any warping of the wheel assembly.
When tightening the lug nuts, apply a steady and consistent force. It’s important to ensure that each nut is firmly secured without exerting excessive force that could damage the wheel studs. This careful approach guarantees the tire remains properly fitted and ready for safe travel until a more permanent repair or replacement can be arranged.
With the spare tire securely in place, focus on confirming all aspects of the installation. Carefully examine the lug nuts to ensure they are properly tightened and seated against the wheel. A torque wrench provides precise confirmation that the nuts are fastened according to the vehicle's specifications, preventing any potential issues from vibrations while driving. This meticulous approach helps maintain the wheel's stability and ensures reliable performance on the road.
Next, address the tire pressure of the installed spare. A dependable tire pressure gauge will help measure the PSI, which should match the figures specified by the vehicle manufacturer. This information is usually found in the owner's manual or on a sticker in the driver's side door frame. Proper tire inflation is vital for safe handling and vehicle efficiency, particularly when navigating winter roads.
Finally, ensure your workspace is cleared, with all tools packed away and no debris left behind. Survey the area around your vehicle to confirm that nothing remains on the ground, which could pose a hazard to other drivers or yourself. By ensuring everything is in order, you set the stage for a safe resumption of your journey, ready to tackle the unpredictable conditions of winter driving.
Successfully changing a flat tire in winter conditions requires preparation, the right tools, and knowledge of cold-weather safety procedures. By following these steps and maintaining a well-stocked emergency kit, you can handle this common roadside challenge confidently and safely. When you're ready to replace that spare with new tires, we make it easy to shop for tires online and find the best deals that match your vehicle and driving needs.
Search By